Learn the art of printed cardmaking or make a greeting card with printed or photographic images.
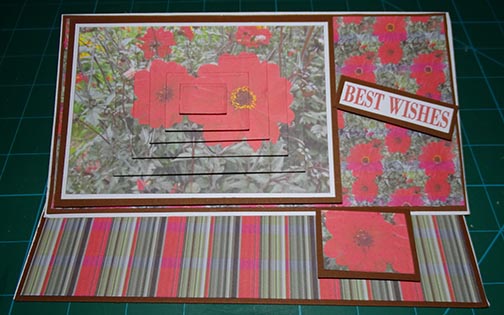
Here is a step by step tutorial with pictures of an easel pyramage card using printed images. A lovely tutorial to use printable on CD-Roms in cardmaking.
Materials Needed
Printed images x4 – Dahlias dahlias-printable-by-anino-ogunjobi,
Printed patterned paper A5- Dahlias seamless and stripe- dahlias-printable-by-anino-ogunjobi
Cardstock A4: White x2, Brown x2,
3d sticky foam pad,
Craft dies optional if you cut shapes well( I use Tonic mixed layering rectangle dies),
Embossing /die-cutting machine if using craft-dies,
Scissors,
Printed sentiments- Best wishes,
Liquid glue,
Scoreboard and its bone folder

Instructions
Step 1: Score, fold and burnish the A4 cardstock to form an A5 card. Cut the dahlia toppers. Using liquid glue mat and layer it on a white cardstock and then cut leave a little border. Mat and layer to the chocolate brown card and trim it, leaving a little border.

To form the easel
Step 2: Place the topper(in step 1) on the front of the card(folded as an A5 card) to measure the dimension needed for the topper and then score on the line after the topper’s dimension( including space)- about 11cm.

Step 3: Cut an A5 brown cardstock and then cut the stripe pattern paper smaller than the A5 brown cardstock. Mat and layer the stripe-cardstock on the brown cardstock and then glue to the inside of A5 white card(as shown in the picture).

Step 4: Cut brown cardstock a little smaller than the front of the easel panel in step 2. Cut seamless dahlia patterned paper smaller than the brown cardstock(for the panel). Glue the seamless dahlia paper to the brown cardstock and then glue to the front of the panel.


Step 5: Cut out each rectangle of the dahlia and then place 3d sticky foam pad at the back of each topper.


Step 6: Layer the dahlias from the largest to the smallest on the topper with border, made in step 1.


To make the stopper for the easel
Step 7: Cut a small rectangle of dahlia and then layer it on a brown cardstock. Trim the brown cardstock leaving a small border. Place sticky foam pad at the back of the brown cardstock push the easel as desired and place the stopper on the required base of the card(see the picture).


Step 8: Place the pyramage topper on the front patterned panel. Cut out printed sentiment and layer it on a brown cardstock. Place 3d sticky foam pad at the back and then place on the front of the card near the topper.


